It is 5
PM on a Friday. A script nameddeploy-final-v3-now-it-works.ps1 runs on your machine, but no one knows what changed since the last version. The fix needs to reach production, the original author has already logged off, and the only available history is scattered between a shared folder and chat messages. (Or worse, locked in a Service Desk ticket that no one can access).
The problem is not just the file name. We lack a reliable answer to basic questions: what changed, why it changed, who reviewed it, and how do we roll it back?
This is the point where Git stops being “a developer tool” and becomes part of operations. Pipelines, infrastructure as code files, automation scripts, and documentation are operational code. If a change can affect the environment, it needs to be traceable.
For teams managing Azure and Microsoft 365, this includes Bicep templates, scripts for Microsoft Graph and Exchange Online, CI/CD configurations, and runbooks. Files exported from these services also require review before the commit: they might contain email addresses, internal identifiers, or other data that should not leave the authorized environment.
This guide teaches Git applied to DevOps work, not all the tools in this universe. You do not need to know Terraform, Bicep, Ansible, or Kubernetes: the lab uses only Git and PowerShell. It is useful for those entering DevOps and for infrastructure professionals who already automate tasks but do not version their work yet.
What you will be able to do#
By the end of this guide, you will have a basic workflow to:
- create or clone a repository;
- identify the state of files;
- select changes and create small commits;
- work on a branch without directly altering the main line;
- push the branch to a remote repository;
- validate what will be reviewed;
- undo mistakes in a way that is compatible with teamwork.
The goal is not to memorize all commands. It is to understand the path a change takes and know where to inspect it before moving forward.
Prerequisites and tested environment#
You will need:
- Git installed;
- a terminal;
- a text editor;
- an account on a Git hosting service, like Azure Repos, GitHub, or GitLab, solely for the remote step;
- a lab repository without sensitive data.
The examples were tested in PowerShell 7.6.3 with Git for Windows 2.50.1. The git commands are the same in Linux and macOS; only the commands used to create files in the lab might vary between shells.
Verify the installation:
git --versionNote
Git is the version control system. Azure Repos, GitHub, and GitLab are platforms that host Git repositories and add features like pull requests, policies, permissions, and pipelines.
The mental model that prevents most confusion#
A change passes through four places:
Working directory → Staging area → Local repository → Remote repository edit git add git commit git push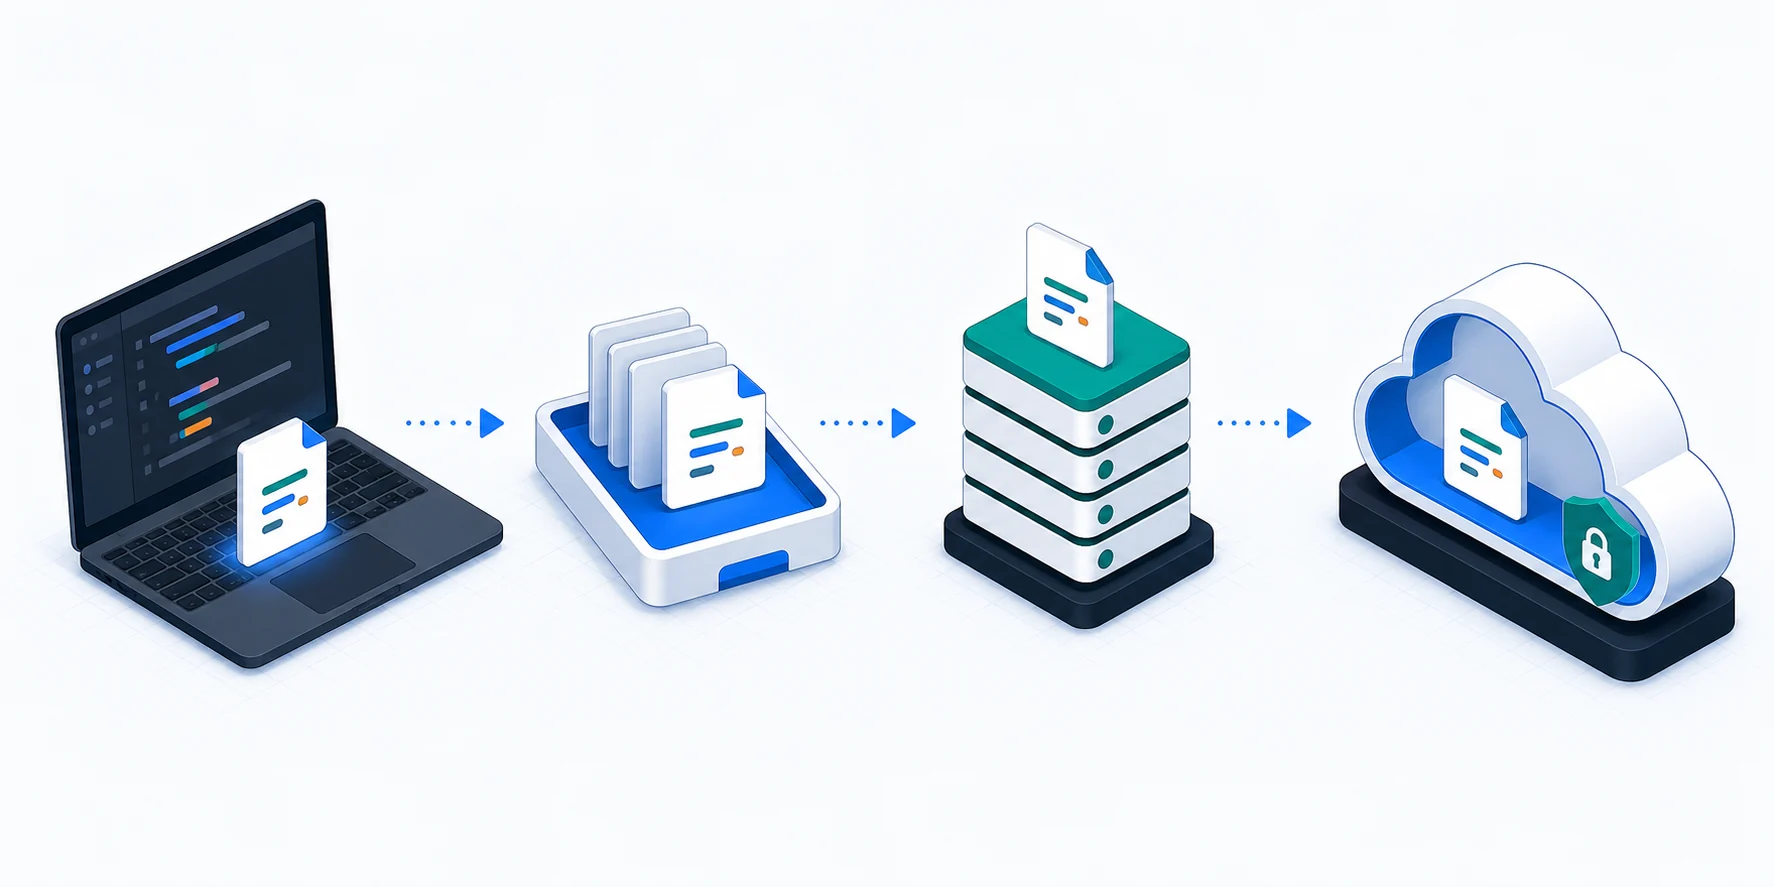
- Working directory: the files you are currently editing.
- Staging area: the exact selection that will enter the next commit.
- Local repository: the commit history stored in the hidden
.gitfolder. - Remote repository: a copy accessible by the team on another server.
git add does not send anything to the internet. git commit does not either. Sending it to the server happens with git push.
Think of the commit as a photograph with context: it records the selected content, the author, the date, and a message. A good sequence of commits tells the story of the change without relying on the memory of the person who executed it.
Configure your identity#
Your name and email are recorded in the commits. Set values associated with your professional identity:
git config --global user.name "<YOUR_NAME>"git config --global user.email "<YOUR_VERIFIED_EMAIL>"git config --global init.defaultBranch mainCheck the result and the origin of each configuration:
git config --global --list --show-originReplace <YOUR_NAME> and <YOUR_VERIFIED_EMAIL>. On a machine used for different contexts, you can override the identity just for the current repository:
git config user.name "<NAME_FOR_THIS_REPOSITORY>"git config user.email "<EMAIL_FOR_THIS_REPOSITORY>"Without --global, the setting is only valid for the repository where the command was executed.
Create the lab#
Create an empty folder and initialize the repository:
New-Item -ItemType Directory -Path git-lab | Out-NullSet-Location git-labgit initIf the project already exists on a server, do not use git init. Clone it:
git clone <REPOSITORY_URL>Set-Location <CLONED_FOLDER_NAME>The clone brings the files, the available history, and the configuration of the remote called origin.
For the locally started lab, create two files:
New-Item -ItemType Directory -Path scripts | Out-NullSet-Content -Path README.md -Value "# Automation lab"Set-Content -Path scripts/deploy.ps1 -Value "Write-Output 'Deploy simulation'"Now ask Git what it sees:
git statusThe files appear as untracked: they exist in the directory, but are not yet part of a commit.
Protect the repository before the first commit#
Create a .gitignore file at the root to exclude local, temporary, or generated files. In an infrastructure as code project, a starting point could be:
# Local settings and credentials.env*.pem*.tfvars!*.tfvars.example
# Terraform state and cache*.tfstate*.tfstate.*.terraform/
# Temporary files*.logtmp/
# Editor local preferences; remove if the team shares these settings.vscode/
The exact pattern depends on the project’s tools. Review each rule: ignoring a necessary file can make the automation impossible to reproduce.
Do not ignore PowerShell ecosystem extensions in a generic way. Files like .psd1, .psm1, and .ps1xml can be part of a module’s source code, and in that case, they need to be versioned. Only ignore truly local or reproducible outputs, according to the team’s structure and policy.
Warning
.gitignoreis not a vault and does not remove files that are already in the history. Never record passwords, tokens, private keys, connection strings, or Azure credentials in versioned files. Prefer secretless authentication, like managed identity or workload identity federation, when available. When a credential is unavoidable, use a secrets manager, like Azure Key Vault, and protected variables from your CI/CD platform.
If a secret is included in a commit, consider it compromised: revoke or rotate the credential immediately and follow the organization’s incident response procedure. Deleting the file in the next commit does not remove the previous copies.
Select and record the first change#
Add only the files related to the goal of the commit:
git add README.md scripts/deploy.ps1 .gitignoregit statusPrefer explicit paths while learning. git add . is convenient, but it might include a file you did not intend to version.
Before the commit, review the selected content:
git diff --stagedIf the diff matches what you intend to deliver, create the commit:
git commit -m "chore: starts automation lab"Note
The
<type>: <description>format follows the Conventional Commits convention. In this guide,chore:identifies a preparation or maintenance task, whilefeat:indicates a new feature anddocs:a documentation change. Git does not require this convention, and the team can adopt other types. It makes the history more predictable and can feed changelogs or automated versioning when the project configures tools for it.
A useful message explains the intent. “Updates files” says little; “adds validation for deploy parameters” helps whoever investigates a failure months later.
Check the history:
git log --oneline --decorateThe identifier shown at the beginning of each line is the short form of the commit hash.
Work on a branch#
A branch is a line of work that points to a commit. It allows you to prepare a change without directly altering the main branch.
Create a branch with a short, descriptive name:
git switch -c feature/validate-environmentEdit scripts/deploy.ps1 to require the environment name:
param(    [Parameter(Mandatory)]    [ValidateSet('dev', 'stg', 'prd')]    [string]$Environment)
Write-Output "Deploy simulation in environment: $Environment"
Inspect the changes not yet added to the staging area:
git statusgit diffExecute the script with an allowed value:
./scripts/deploy.ps1 -Environment devThe expected result is:
Deploy simulation in environment: devRecord the change:
git add scripts/deploy.ps1git diff --stagedgit commit -m "feat: validates environment before deploy"The essential cycle is always the same:
Edit → Validate → Review diff → Add to staging → CommitConnect the local repository to a remote#
Create an empty repository on the chosen platform, without initializing it with a README or other files. For this first lab, copy the HTTPS URL. Then, in the local repository:
git remote add origin <REPOSITORY_URL>git remote -vReplace <REPOSITORY_URL> with the real URL.
Authenticate before the first push#
With HTTPS, prefer the Git Credential Manager (GCM). The current Git for Windows installer already includes GCM, so anyone who accepted this component during installation usually does not need to download it separately. Once it is installed and configured, the first access opens an authentication flow in the browser and stores the token in the system’s secure manager:
- in Azure Repos, use GCM with a Microsoft account or Microsoft Entra ID; Microsoft Entra tokens are preferable to PATs;
- in GitHub, use GCM or the GitHub CLI to authenticate via the browser;
- in other platforms, consult the official documentation before generating a credential.
SSH is also a secure option, but it requires preparation: generating a key pair, protecting the private key, loading the key into the SSH agent, and registering the public key on the platform. Organizations with single sign-on may still require key authorization. If these steps were not completed, an SSH URL will make the first push fail.
Warning
Do not put PATs, passwords, or other tokens in the remote URL, in the script file, or in the terminal history. If the organization requires a PAT, use minimum scope, short expiration, and the storage mechanism recommended by the platform.
With the authentication prepared, push the branches:
git push -u origin maingit push -u origin feature/validate-environmentThe first command publishes the base created in main; the second publishes the isolated change. The -u option associates each local branch with its remote counterpart. For the next pushes of the current branch, git push will be enough.
In a corporate environment, open a pull request to integrate the change into main. The pull request creates a space for review, test execution, and policy application. It does not replace well-organized commits; it depends on them to show an understandable story.
Important
Do not push directly to
mainwhen the repository requires review. Respect the branch policies, the designated approvers, and the automated checks defined by the team.
Start the next work from the updated base#
After the change is integrated, update the main branch before starting another task:
git switch maingit pull --ff-only origin maingit switch -c docs/document-rollbackgit pull fetches changes from the remote and tries to integrate them. The --ff-only option only accepts a linear update; if the histories have diverged, the command stops instead of automatically creating a merge. In that case, inspect the situation and follow the workflow defined by the team.
Use the new branch to document the rollback procedure. Create the file:
# Lab rollback
1. Suspend new pipeline executions.2. Identify the last validated commit.3. Execute the rollback procedure approved by the team.4. Validate the service and record the evidence.
Review and record only this document:
git add ROLLBACK.mdgit diff --stagedgit commit -m "docs: documents deploy rollback"git push -u origin docs/document-rollbackThis push publishes the documentation branch and closes the same cycle used previously: edit, review, commit, and push. Open another pull request if the repository requires review before incorporating the procedure into main.
When you just want to check the remote, without integrating anything:
git fetch origingit statusgit log --oneline --graph --decorate --all -10git fetch updates the remote references and preserves your working directory. This makes it a good first step before deciding between merge, rebase, or another strategy.
Understand and resolve conflicts#
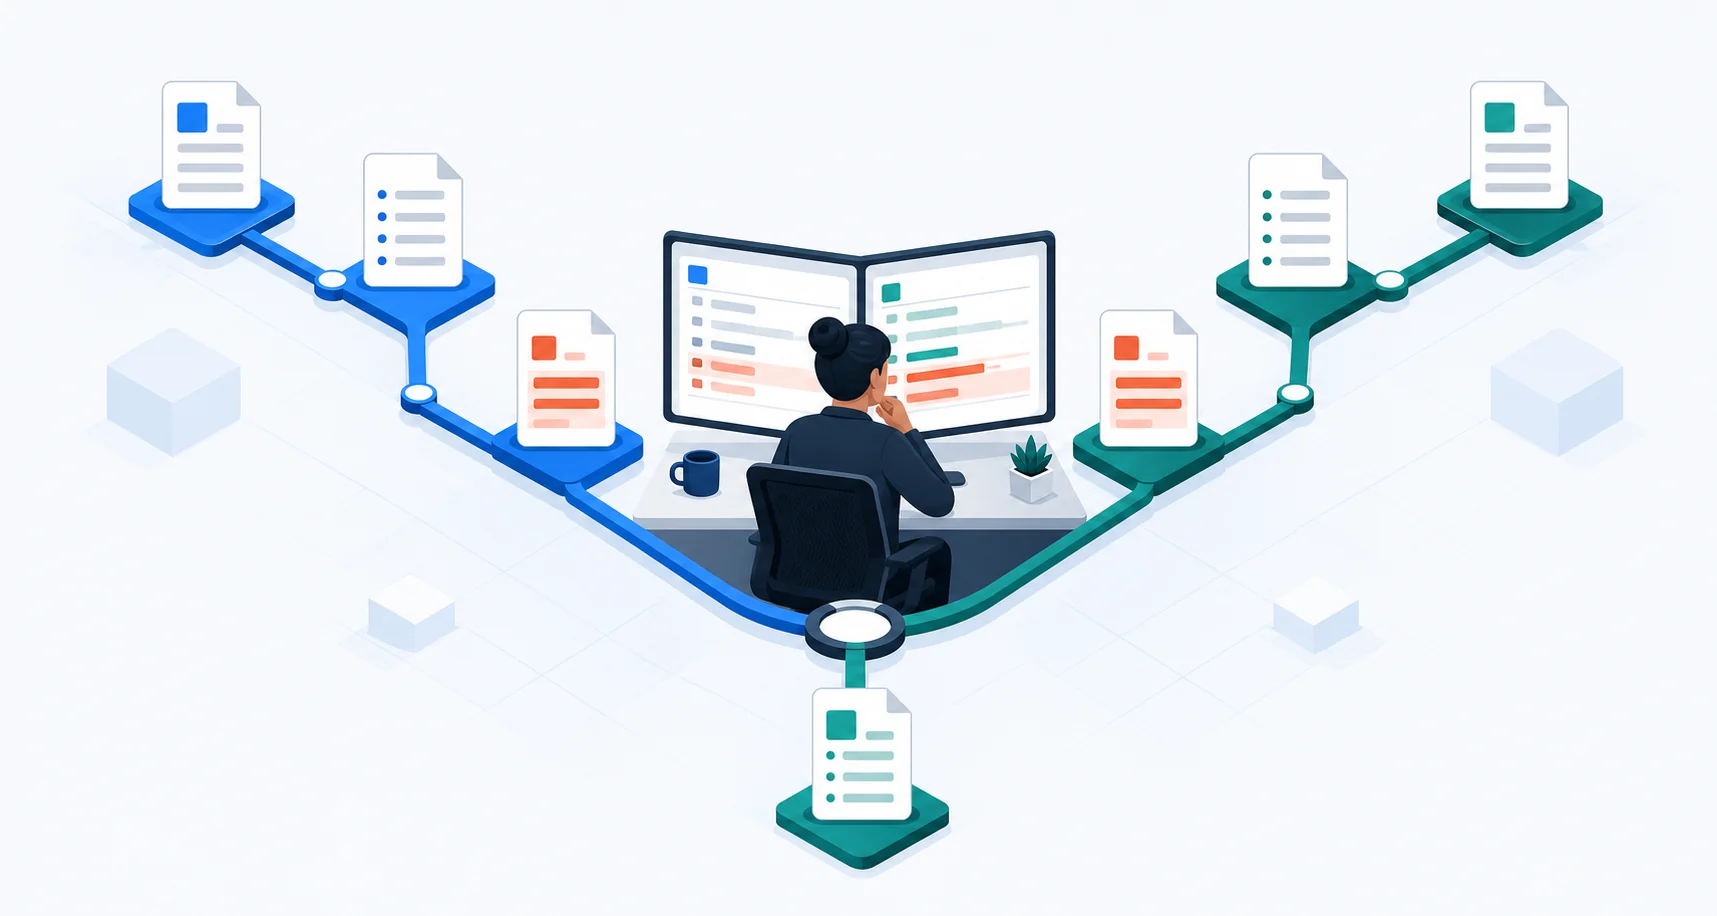
A conflict occurs when Git cannot choose on its own how to combine changes. This usually happens when two branches alter the same region of a file or when one edits a file that the other removed. Two people modifying the same file does not necessarily produce a conflict: the problem arises when Git cannot safely reconcile the results.
It does not mean the repository is corrupted; it means a human decision is necessary.
Generate a controlled conflict#
Do this exercise only in the lab repository. Start from the updated main and create a branch that allows the disaster recovery environment, dr:
git switch maingit pull --ff-only origin maingit switch -c lab/accept-drIn scripts/deploy.ps1, replace the validation line with:
[ValidateSet('dev', 'stg', 'prd', 'dr')]Record the first alternative:
git add scripts/deploy.ps1git commit -m "feat: accepts recovery environment"Go back to the same base and create another branch:
git switch maingit switch -c lab/accept-qaNow alter exactly the same line, but include qa instead of dr:
[ValidateSet('dev', 'qa', 'stg', 'prd')]Record the second alternative:
git add scripts/deploy.ps1git commit -m "feat: accepts quality environment"Both branches started from the same commit and modified the same line in different ways. Try to combine them:
git merge lab/accept-drThe merge should stop with a conflict message. This is the expected outcome of the exercise. Inspect the state and the file:
git statusGet-Content scripts/deploy.ps1Git lists scripts/deploy.ps1 as unmerged. Inside it, the disputed region will have markers similar to these:
<<<<<<< HEAD[ValidateSet('dev', 'qa', 'stg', 'prd')]=======[ValidateSet('dev', 'stg', 'prd', 'dr')]>>>>>>> lab/accept-drHEAD represents the current branch, lab/accept-qa; the snippet below ======= came from the branch you tried to merge. In this lab, the decision is to accept both environments. Remove the markers and leave the line like this:
[ValidateSet('dev', 'qa', 'stg', 'prd', 'dr')]Test both values, check that no markers remain, and conclude the merge:
./scripts/deploy.ps1 -Environment qa./scripts/deploy.ps1 -Environment drgit diff --checkgit add scripts/deploy.ps1git commit -m "chore: resolves environment conflict"git statusThe directory is clean again, and the history now records the resolution. The branches lab/accept-qa and lab/accept-dr were created locally only; there is no need to push them to the remote.
In a real conflict, if you still do not know which result is valid, do not improvise. Before recording the resolution, abort the merge and ask for context:
git merge --abortIn DevOps, a conflict in a firewall rule, environment variable, or pipeline step can be syntactically simple and operationally dangerous. The resolution must consider the effect on the environment, not just make Git stop complaining.
Undo changes with the appropriate command#
“Undoing” can mean different things. Before running a command, identify where the change is:
| Situation | Command | Effect |
|---|---|---|
| File was added to staging by mistake | git restore --staged <FILE> | Removes it from the next commit and keeps the local edit |
| Local edit of a tracked file should be discarded | git restore <FILE> | Restores the file and discards the uncommitted edit |
| Shared commit introduced an error | git revert <COMMIT_HASH> | Creates a new commit that applies the inverse operation |
| In-progress merge should be aborted | git merge --abort | Returns to the state before the merge started, when possible |
Practice the difference between staging and local edit#
In the lab repository, make a temporary change and add it to staging:
Add-Content -Path README.md -Value "Temporary note"git add README.mdgit statusNow remove the file from the next commit and inspect the result:
git restore --staged README.mdgit statusgit diffREADME.md is no longer in staging, but the note remains in the working directory. This is the core point: git restore --staged changes the selection for the next commit; it does not erase your edit.
Caution
git restore <FILE>discards local changes that are not saved elsewhere. Checkgit difffirst. Avoidgit reset --hardwhile learning: it can move references and eliminate changes from the working directory.
After confirming you are in the lab and the only difference is the temporary note, discard it:
git restore README.mdgit statusIn shared branches, git revert is usually safer because it preserves the history. Rewriting commits that other people have already downloaded can force the whole team to reconcile different histories.
Validate before the pull request#
An efficient review starts before opening the pull request. Run:
git statusgit diff --checkgit log --oneline origin/main..HEADgit diff origin/main...HEADThese commands answer, respectively:
- are there forgotten files or changes outside of staging?
- does the diff contain common whitespace issues?
- which commits exist only in your branch?
- what is the accumulated content of the change since the common base?
Then, run the project’s validators. Examples:
# PowerShellInvoke-ScriptAnalyzer -Path ./scripts
# Terraformterraform fmt -check -recursiveterraform validate
# Node.js Projectpnpm test
Use only the commands expected in the repository. The presence of an example in this list does not mean the tool is installed or configured in your project.
Finally, review the pull request as if you were the on-call person who will receive an alert at 3 AM:
- does the title explain the result?
- does the description inform the reason, test, risk, and rollback?
- does each commit address a coherent topic?
- does the diff contain credentials, personal data, or customer names?
- does the change alter permissions, costs, availability, or retention?
- can someone else validate it without relying on a private conversation?
Security, authorship, and licenses#
An organized repository also needs clear boundaries:
- grant access using the principle of least privilege;
- use protected branches and review for sensitive changes;
- keep secrets out of versioned files;
- do not use Git as a replacement for backing up artifacts and operational data;
- do not version generated binaries when they can be reproduced;
- do not copy scripts, modules, images, or documentation without verifying the license and usage authorization.
A public repository does not automatically make the content public domain. When incorporating third-party material, preserve copyright notices, attributions, and required license texts. Record the source and confirm the license is compatible with how your project is used and distributed. When in doubt, consult the organization’s policy or legal counsel.
For your own content, a LICENSE file makes it clearer what others can do. Code licenses, documentation licenses, and terms of external services can be different; treat each material according to its origin.
The workflow on one page#
When starting a task:
git switch maingit pull --ff-only origin maingit switch -c <TYPE>/<SHORT-DESCRIPTION>During the work:
git statusgit diff# run the project testsgit add <CHANGED_FILES>git diff --stagedgit commit -m "<TYPE>: <INTENT_OF_THE_CHANGE>"Before the review:
git fetch origingit log --oneline origin/main..HEADgit diff origin/main...HEADgit push -u origin <BRANCH_NAME>The names between < and > are values you should replace.
References#
- Pro Git: about version control
- Pro Git: recording changes to the repository
- Pro Git: branches in a nutshell
git-adddocumentationgit-restoredocumentationgit-revertdocumentation- Conventional Commits 1.0.0
- GitHub Docs: ignoring files
- GitHub Docs: caching your GitHub credentials in Git
- GitHub Docs: connecting to GitHub with SSH
- GitHub Docs: storing your secrets safely
- Microsoft Learn: set up Git Credential Managers for Azure Repos
- Microsoft Learn: protect secrets in Azure PowerShell
- Microsoft Learn: secrets in Azure Pipelines
Conclusion#
Next Friday at 5
PM, the goal is not to have a file namedfinal-v4. It is to find a branch with a clear scope, commits that explain the decision, tests recorded in the pull request, and a safe way to revert what was published.
Git does not eliminate failures. It turns changes into evidence: it shows what happened, preserves context, and allows the team to collaborate without relying on duplicated files or individual memory.
Start with four habits: check git status, read the diff, make small commits, and never version secrets. The rest of Git becomes simpler when this foundation is solid.